
It’s time for another tutorial, and I’m happy to share about one of my favorites, the Post Grid plugin! I like it so much because it helps me organize my blog posts and display feature images without cutting them.

WHAT IS A POST GRID?
I didn’t know what it was called, but I knew exactly how I want my blog to look look like. Luckily, I stumbled upon a post about this grid layout, probably from wpbeginner.com since I’ve been receiving emails from them.
So, a post grid is what I have on my home page and on my freebies page. It’s an arrangement or display of your blog posts showing only the feature images arranged on a grid. You can choose to show all your posts or only some posts under the same category.
Some pages show my post starting from the newest.

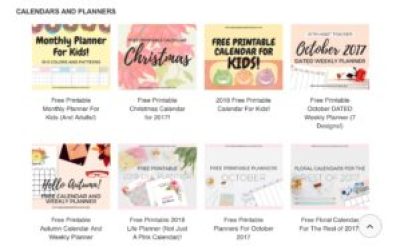
My FREEBIES page shows several post grids on a full page layout. Here’s the post grid under the category Free Planners.
LET’S START!
First of all, you must download a post grid plugin. There are others out there, but what I use is the Post Grid by pickplugins. I didn’t upgrade to premium since I planned to keep it simple.

Don’t forget to activate the plugin! After that, look for POST GRID on your WordPress dashboard and hit New Post Grid. Write a TITLE for your post grid, but this won’t show on your blog.

HOW TO DISPLAY ALL YOUR POSTS
Go to QUERY POSTS > POST TYPES then make sure that POSTS is checked from the dropdown list. I didn’t change anything else at this point. Hit PUBLISH to create your first post grid.
Then, go to SHORTCODES and copy the PHP code. Paste this on your page where you want the post grid to show. Check a preview of your post and decide what changes you would like to make.
CUSTOMIZING YOUR POST GRID
There are several features that you can apply on your post grid, but I can only tell you about what I’ve used so far.
Choose which posts to display.
Go to QUERY POSTS > POST TYPES and place a check mark on what you want to display. I think you can display more than one type. So far, I only needed to display posts and projects separately.
Then, go to QUERY POSTS > TAXONOMY AND TERMS. Click the dropdown list that says 0 items and choose the category or tag that you want to display.

Assign how many posts per page.
You can do this under QUERY POSTS > POSTS PER PAGE. The default value is 10, which means a second page is created after you go over 10 posts.
Change the size of the images displayed or show more posts per row.
The number of posts per row depends on how many images can fit on the page width. You can adjust the width to display only one image per row. You can also make the image width smaller to display 3 or more posts per row.
Go to LAYOUT SETTINGS > GRID ITEMS WIDTH and experiment to find the perfect width. The default value is 280px. On my blog, I use 200px for Freebies and 260px for my Home page.

Display more items on your post grid.
Go to LAYOUT > CONTENT LAYOUT. I didn’t change anything else, so my post grid still has the Flat layout.
Hit EDIT to go to the Layout editor. There, you can choose to add or remove items like the title, link, excerpt and read more. In my case, I chose to include only the title.

To change the title size, tap TITLE and it will show you some settings. I changed the settings from 12px to 16px to make the titles bigger.
Always remember to save your changes!
And that, my friends, is everything I did for my post grid! There are a lot more options and you can even upgrade to premium. However, I wanted to keep things simple so my blog loads as fast as possible.
Let me know if this helps! A lot of blogs have helped me put up my own, and sharing this is my little way of giving back to the community.
Love you all!
Hugs,
Mae


Thanks for the write-up, looking to implement something similar and this plugin looks pretty awesome. Keep up the good work!
You’re welcome Lorenzo, I’m really thankful for these plugins, they are so helpful!?
Super excited to read your post! I have been looking for a way to organize my posts on my category pages and I have finally found it in this post. Thanks for sharing how you did it 🙂 I will definitely be pinning this and can’t wait to see more things for me to learn.
You’re welcome Tracy!
Love,
Mae